Introduction
In the last post, I showed you how to create your own machine learning model that a Postbus recognizes in the cloud with Azure Cognitive Services – here the Custom Vision API. Now it’s time to start something with the model.
If you’ve experimented with the capabilities of the Custom Vision API, you’ll find that it’s really a powerful service. … Clear! Cloud! But what if you want to build an application that can’t always access the cloud? Just as I have it in my main story with the post bus (if you don’t remember, you can read here).
What plays into my postbus scenario is the sporadic internet connection. My smart security cam solution is not quite in full reach to my Wi-Fi. So I needed a solution that a post bus doesn’t recognize in the cloud, but on a device (on the edge).
And that is what this article is about. Today you will run the model that you created on your PC – without Cloud. In any of the following posts, I’ll show you how to get the whole thing up and running on a device, in my case, Nvidia’s Jetson Nano. Let’s get started!

Setup
To run the ML model locally on your PC, you don’t need much. Here is the shopping list for you:
- Docker Desktop
- Visual Studio Code (VS Code)
So let’s start with the necessary installations. The order is not decisive.
- First, please install Docker Desktop.
Unfortunately, you can’t go over the convenient way of installing it on Linux as well. Docker Docs may help with that. - Now you’ll install VS Code if you don’t have this outstanding editor on your system yet.
Setup VSCode for optimal use
If you have installed and configured everything so successfully, we can get started. To have a good working environment, I suggest setting up VSCode so that you can use everything we need from this tool.
In VS Code there is the possibility to load extensions for the editor and thus gain rich functions. We need Docker Containers and Python Extensions here. But if you’re already there… Install the Azure Tools, as well as Azure IoT Tools (you’ll get ahead with one of the next posts)


If you are installing the Python extension, please note the installation instructions. Python must also be installed if you don’t have it on it yet.
Download the ML model
At this point, your “development environment” should be set up and we can now focus on the actual work.
Microsoft has responded a lot to community and customer feedback over time, allowing the user to download their model in different formats. We want to use this and operate our model locally as a container.
To do this, please go to the Custom Vision Portal. There you select your project and click on Performance in the menu at the top.

Just below it is the “Export” button, which you also click on.

Various options are offered on the menu that appears. You can use your model for app development on iOS or Download Android, but also for Windows and especially for the Vision AI Dev Kit, which you can also use as a smart security cam.
The option of interest to us is “Dockerfile”. This downloads a package that includes Python Code, the ML model, and a Dockerfile.
For our project, you select the Linux configuration. The button you click is called “Export” at the first click – this prepares your model for export. If it’s packaged – it really only takes a second or two – the button is called “Download” and you can continue.

Since you are probably curious about the content, here is the description of it:

The Dockerfile.
If you haven’t had to deal with Docker containers yet, now may be the right time to work your way in. Documentation
As you can see, it takes Python as an interpreter, the NumPy module for working with Array, Tensorflow for working with the ML model, flask, which serves as a web server for the Rest API, and pillow for processing images. The port for the Rest API is set to 80 and the contents of the App folder are copied to the container.
In addition, you will find two directories. The folder “azureml” is not very interesting for us today. It is used to create an AzureML service; hosted and managed by MLOps in Azure. You could also delete it if it bothers you here. More interesting, however, is the “app” folder. This contains the complete logic for setting up a Web API and detecting objects.
The file app.py contains the logic of the application (call WebServer, waiting for an image, querying the ML model and returning the result as JSON). The files Predict.py and object_detection.py take over the ML work.

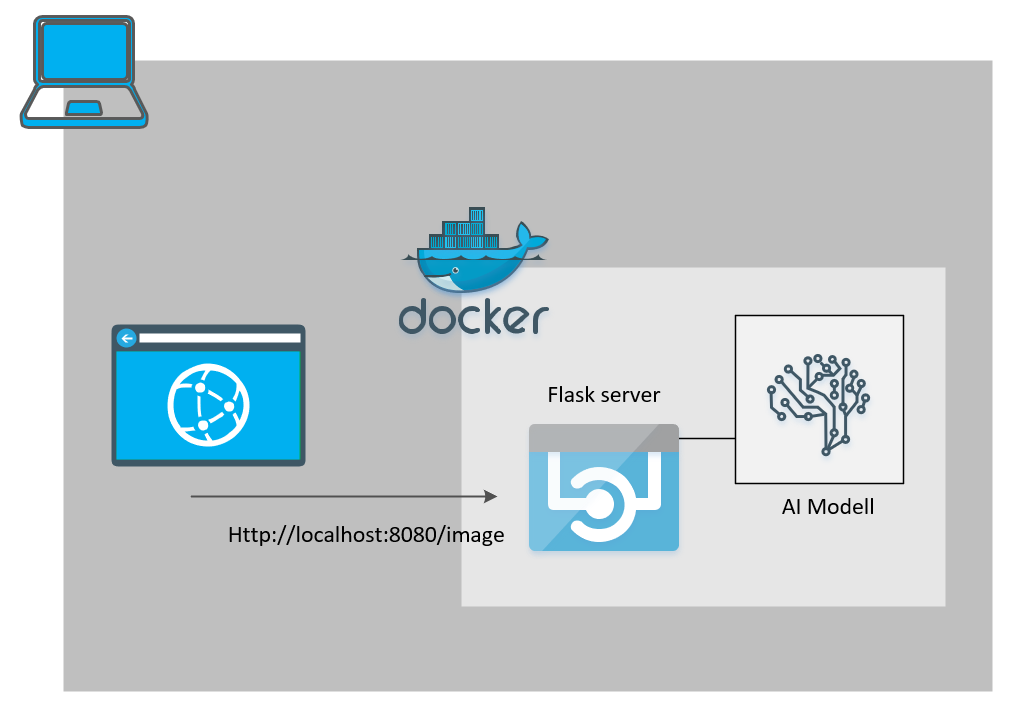
The image shows how the application will work as a Docker container.
Via a rest call on, for example, localhost:8080 you can pass an image to the container (Postman is your friend). This is then “analyzed” by tensor flow and returned as a Json response.
Go local…
Next, we build the image.
If you use VSCode as I described it at the beginning, you can now have an image created by right-clicking on the Dockerfile.

In VSCode, you must then enter the image name at the top. Either you specify with the repository or use a local (e.g. myRepository.io/postcardetection:latest or postcardetection:latest).
In Powershell, you can also use the
docker build --rm -f "Path to dockerfile" -t your-image-name:latest "."
start your build.

The build process takes some time. You can track what is installed and set up.
After a successful build, you can use your “app”.

In VSCode, you select Docker on the left in the Activity Bar. Then you select your image. By right-clicking on the “latest” image, you can select “Run” in the context menu to run the Docker image as a container.-> via Powershell also via
docker run --rm -d -p 80:80/tcp your-image-name:latest
Of course, you can adapt the port to your changes!


When the container is running, you can use the tool of your choice to place the rest of the call to the container. I use Postman here, but also Powershell can help (only you might have trouble sending the picture in the corresponding body of the Invoke-Rest Command – have fun tinkering).

The rest of the call is a POST – which you have to set. The address, if you haven’t changed the port in the Dockerfile, is 80. The address is probably http://localhost:80/image or of course http://localhost/image .
In Postman you switch to the body settings and there to binary. This will allow you to build rest of the binary data call, i.e. an image, in the body to the URL.

Click on the “Select file” button and select a picture with a post bus in a scene. (I once chose the image from the high-level architecture of my intro blog post).

Now, when you click Send in Postman, your image is transferred to the container and evaluated, as in the function overview above. As a response, you get the result in Json format.

The result of my architectural image is a found post bus, which was detected with a probability of 81.7%. At the same time, we also receive the bounding box, i.e. the position in the picture. That is a good result! The smaller post bus at the top of the picture is not recognized, as it is probably just too small and therefore too “unsharp” for the detector.
In order to paint the box in an image, the coordinates (top, [in percent]left, width, height) still have to be calculated with the image dimensions, because the image was normalized during detection.
Example: If your image is 866×484, then you’ll get for
top: 484 * 0.565 x 274
left: 866 * 0.0775 x 67
width: 484 * 0.154 x 75
height: 866 * 0.115 x 100
Our rectangle, that we would have to draw would be after
(x1,y1, x2,y2)(67, 274, (67 + 75), (274 + 100) )
Now you have your own local Postbus recognition system. It’s certainly not very comfortable with the rest of the calls, but if you use some programming skills now, you can certainly quickly conjure up a nice and elegant solution. Try it and share your feedback with me as a comment under the post or write me a mail. I’m happy.